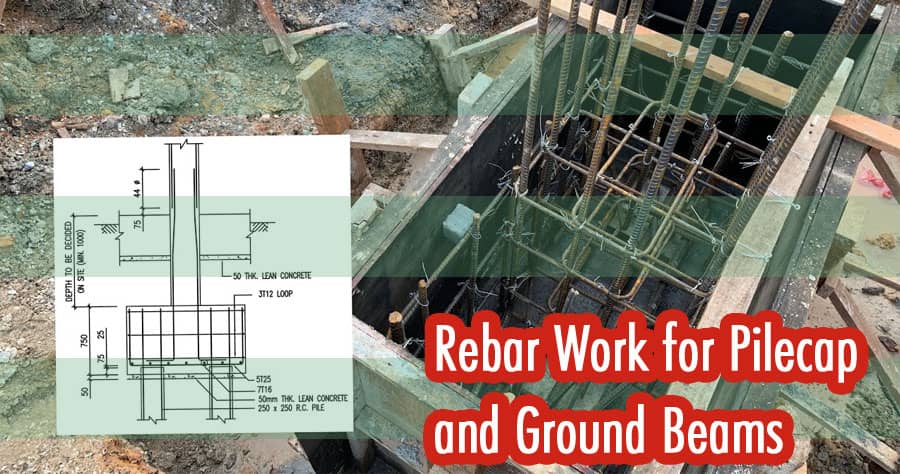
Process of Rebar Work for Pilecap and Ground Beams

Introduction
Reinforced concrete structures require proper reinforcement to ensure their strength and durability. Pile caps and ground beams are important components in building foundations, providing support and transferring loads to the underlying soil.
Understanding Pile Caps and Ground Beams
Pile caps are horizontal concrete elements that connect piles together, distributing the load from the superstructure to the piles. Ground beams, on the other hand, are concrete beams constructed at or near ground level to support walls, columns, or other structural elements. Both pile caps and ground beams require careful reinforcement to enhance their strength and structural integrity.
Materials and Tools Required
Before starting the rebar work for pile caps and ground beams, gather the following materials and tools:
- Reinforcement bars (rebar)
- Reinforcement mesh (if required)
- Tie wires
- Rebar cutter
- Rebar bender
- Measuring tape
- Chalk or marking pen
- Support chairs or spacers
- Formwork materials (plywood, lumber, etc.)
- Concrete vibrator
- Safety equipment (gloves, goggles, etc.)
Step 1: Design and Planning
Begin by reviewing the structural drawings and specifications to understand the rebar requirements for the pile caps and ground beams. Take note of the bar sizes, spacing, and lap lengths specified in the design. Plan the reinforcement layout and identify any additional reinforcement, such as stirrups or links, that may be needed.
Step 2: Marking and Setting Out
Using chalk or a marking pen, mark the positions of the rebars on the formwork. Ensure accurate placement by following the structural drawings and dimensions provided. Take care to mark the locations of lap splices, intersections, and any special detailing required.
Step 3: Cutting and Bending Rebar
Cut the reinforcement bars to the required lengths using a rebar cutter. Make clean and accurate cuts to ensure proper fit and alignment. After cutting, use a rebar bender to shape the bars according to the specified bends, angles, and hooks. Pay attention to the bending radius and ensure that the rebars are not damaged during the bending process.
Step 4: Assembling Rebar Cage
Assemble the cut and bent rebars to form the rebar cage. Follow the marked positions and layout from Step 2. Use tie wires to connect the rebars at intersections and overlaps. Ensure that the rebars are properly aligned and securely tied together to maintain the structural integrity of the cage.
Step 5: Placing Rebar Cage in Formwork
Position the assembled rebar cage inside the formwork, ensuring that it is centered and aligned according to the marked positions. Use support chairs or spacers to maintain the required concrete cover for the rebars. Adjust the height and position of the chairs as necessary to achieve the desired concrete cover.
Step 6: Tying Rebar and Support Chairs
Tie the rebar cage to the support chairs or spacers using tie wires. This helps to keep the rebars in place during the concrete pouring process. Make sure the ties are secure but not overly tight, allowing some movement for proper consolidation of the concrete.
Step 7: Checking Alignment and Level
Before pouring the concrete, double-check the alignment and level of the rebar cage. Use a measuring tape or level to ensure that the rebars are positioned correctly and comply with the design specifications. Any necessary adjustments should be made at this stage.
Step 8: Pouring Concrete
Once the rebar cage is in place and properly aligned, it's time to pour the concrete. Ensure that the concrete mix is of the appropriate strength and consistency for the project. Use a concrete vibrator to remove any air bubbles and achieve proper compaction. Pour the concrete slowly and evenly, covering the rebar cage entirely.
Step 9: Curing and Finishing
After pouring the concrete, allow it to cure according to the recommended curing practices. This typically involves covering the concrete with a curing compound, plastic sheeting, or wet hessian to retain moisture and promote proper hydration. Once the concrete has cured sufficiently, remove the formwork and finish the surface as desired.
Conclusion
The process of rebar work for pile caps and ground beams is critical to ensure the structural strength and durability of reinforced concrete structures. By following the outlined steps, you can effectively plan, prepare, and place the reinforcement, creating a well-reinforced foundation for your construction project.
FAQs
How long does concrete take to cure?
The curing time for concrete varies depending on factors such as temperature, humidity, and the type of cement used. In general, concrete reaches its maximum strength within 28 days.
Can reinforcement be added after concrete pouring?
It is not recommended to add reinforcement after concrete pouring. Proper planning and placement of reinforcement before pouring ensure the structural integrity of the pile cap or ground beam.
What is the purpose of support chairs or spacers?
Support chairs or spacers are used to maintain the correct concrete cover for the rebars. They help prevent the rebars from coming into direct contact with the formwork and ensure adequate protection against corrosion.
Can I reuse the formwork for multiple pile caps or ground beams?
Yes, formwork can be reused for multiple pours, as long as it is in good condition and properly cleaned and prepared before each use.
How can I ensure the quality of the rebar work?
To ensure quality, follow the structural drawings and specifications, use proper cutting and bending techniques, and pay attention to the alignment, level, and secure tying of the rebars.
