Usage of Gypsum Boards in Walls and Ceiling
Various types of Gypsum boards are used in walls and ceiling for upgrading them. Today, we will learn about these.
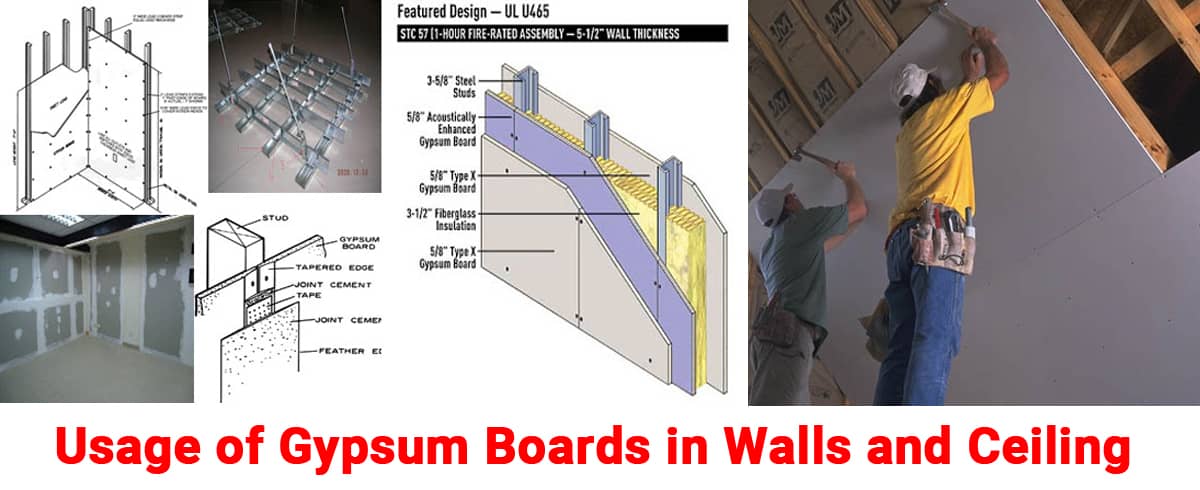
Why should we use Gypsum Boards?
- Ease of establishment
- Fire opposition
- Noise Insulation
- Durability
- Economy Versatility
Types of Gypsum Boards used in construction
Abuse-safe gypsum boards
Standard gypsum boards do not provide as much protection from surface space, scraped areas, or entry as these do.
Eased edge gypsum board
These have a processing plant edge that has been reduced and moderately modified or slanted. It could be used as a guide for custom-finishing joints.
Exterior gypsum soffit board
These boards will be used on the undersides of roofs, overhangs, garages, and other commercial and private outdoor applications that are exposed to the weather from the back. Soffit board comes in 1/2 and 5/8-inch thicknesses, with standard and Type X centres.
Foil-backed gypsum board
The reverse surface of regular gypsum board or other gypsum board objects has been covered with aluminium foil. Foil-sponsored boards act as fume barriers.
Gypsum base for mortar veneer
It fills in as a base for dainty layers of hard, high quality gypsum facade mortar.
Gypsum liner board
Shaft dividers, stairwells, chase routes, region division fire dividers, and hall roofs all use these as a liner board. It has a heat-resistant centre that is encased in moisture-resistant paper. Liner board is available in 1/2 and 1 inch thicknesses, 24 and 48 inch widths, with square edges (once in a while facilitated square edges). Fiberglass tangle facing is also available on gypsum liner board, which improves its weather and form resistance.
Gypsum sheathing
It serves as a fire-resistant layer beneath exterior barrier surfacing materials such as wood siding, brickwork facades, stucco, and shingles. It also adds fundamental inflexibility to the confining structure by providing protection against the entry of water and wind.
The noncombustible middle is covered in water repellent paper, and it may also have a water-resistant centre. Available in widths of 2 feet and 4 feet, with thicknesses of 1/2 inch and 5/8 inch. It is also available with a Type X centre.
Glass tangle facing gypsum sheathing is additionally available. This product is more weather and form resistant than paper-faced gypsum sheathing, and it is commonly used as a substrate for Exterior Insulation Finishing Systems (EIFS).
Impact-safe gypsum panels
These offer more prominent protection from the effect of strong articles from high traffic and vandalism than standard gypsum boards.
Mold-safe board: It fuses different strategies for forestalling the development of form and buildup on the board's surface.
Non-paper-faced gypsum board: It is unfaced or has some covering other than paper.
Regular gypsum board
Also called gypsum wallboard, it is utilized as a surface layer on dividers and roofs.
Sag-resistant board
It is a roof board that offers more noteworthy protection from drooping than customary gypsum items utilized for roofs where confining is regularly divided 24 inches o.c.
Type C gypsum board
Proprietary Type-X gypsum board, also known as Proprietary Type-X gypsum board, is available in 1/2-inch and 5/8-inch thicknesses and is required in some fire-rated churches. This item's fire resistance has been increased by the addition of additional chemicals.
Type X gypsum board: This is available in 1/2-inch and 5/8-inch thicknesses and has better fire resistance because to the use of special centre added chemicals. It can also be ordered with a pre-decorated finish. In most fire-rated congregations, Type X gypsum board is used.
Water-repelling gypsum board
It has a water-resistant paper and a water-safe gypsum centre. In non-wet areas, it serves as a base for clay or plastic divider tile or plastic completion boards. This item is available with a standard or Type X centre and thicknesses of 1/2 inch and 5/8 inch.
How to install Gypsum boards:
- Utilize the accompanying methods to guarantee an effective gypsum board application:
- Introduce roof boards first, at that point the divider boards.
- When sliced to estimate, position gypsum boards into place without compelling them.
- Match comparative edges and finishes, i.e.: decreased to decreased, square-slice closures to square closures.
- Plan to traverse the whole length of roofs or dividers with single boards if conceivable to diminish the quantity of butt joints, which are increasingly hard to wrap up. Stagger the butt joints and find them as a long way from the focal point of the divider and roof as could reasonably be expected so they will be subtle.
- In a solitary employee application, position all board finishes and edges over equal encircling individuals to guarantee that the joints are upheld. (Special case: In a two-handle get together, with glue between the utilizes, the closures and edges of face layers need not fall on supporting individuals.)
Remember to introduce mechanical and electrical gear at the optimum feasible separation relative to the wall to account for the gypsum board thickness so the trim segments, such as spread plates, registers, and grilles, fit efficiently while installing a gypsum board.
Avoid allowing the depth of electrical boxes to exceed the surrounding depth, and avoid placing boxes on opposite sides of a divider in the same stud pit space. Avoid allowing electrical boxes, cupboards, and other devices to pass completely through separators, as this can compromise sound isolation and fire resistance.
For more information please watch the tutorial