How Do I Cut Mitres on Cornices Using a Hand Tool?
Cornices are architectural elements that bring elegance and dimension to any ceiling-to-wall junction. Cutting mitres on cornices using hand tools is a skill that requires precision, patience, and the right approach. Whether you're installing coving in a Victorian living room or adding decorative touches to a modern home, mastering this craft without power tools is entirely achievable.
Understanding the Basics of Cornice Mitre Cuts
Before making any cuts, it's essential to understand what a mitre is. A mitre cut refers to the angled joint created when two pieces of cornice meet at a corner. Typically, this angle is 90 degrees, meaning each piece must be cut at 45 degrees to fit snugly.
There are two types of corners you'll need to cut:
- Internal corners - where the walls meet inside a room.
- External corners - where the cornice wraps around an outward-facing corner.
Essential Hand Tools for Cutting Cornice Mitres
To achieve clean, precise mitres by hand, you will need the following:
- Mitre Box: A hand tool with preset angle guides (usually 45° and 90°) for accurate cutting.
- Fine-Tooth Tenon Saw: Ideal for cutting delicate materials like polystyrene, polyurethane, or plaster coving.
- Pencil and Ruler: For marking your angles clearly.
- Sandpaper or Rasp: For smoothing rough edges.
- Measuring Tape: Accuracy is vital; even a millimetre off can lead to poor joints.
- Adhesive or Coving Cement: For fixing cornices to the wall.
- Filling Knife and Caulk: For finishing and sealing gaps.
Measuring and Marking: The Key to Accuracy
Start by measuring the length of wall space where the cornice will be installed. Then mark the cut direction on the back of the cornice. Always label your pieces as "left" or "right" and indicate whether the cut is for an internal or external corner. Consistency in marking saves time and avoids confusion.
When cutting for an internal corner, the face of the cornice is shorter than the back. For external corners, the face extends beyond the back.
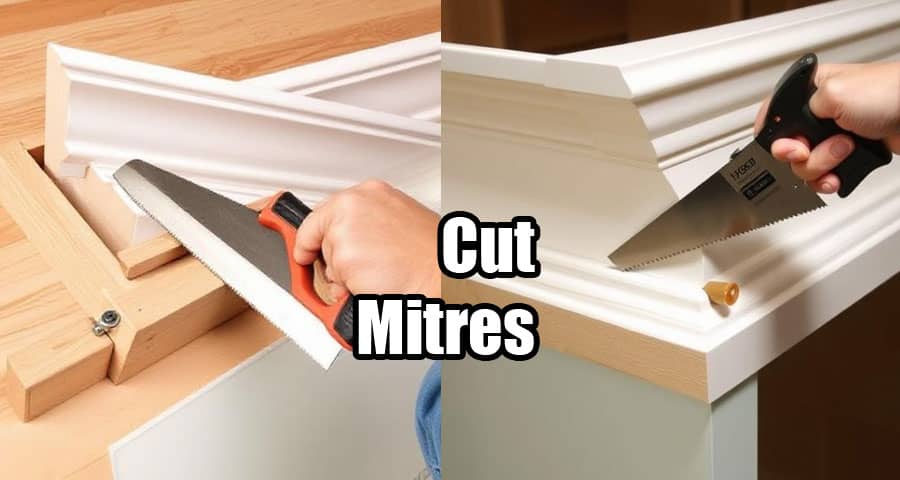
Step-by-Step: Cutting Internal Mitres with a Hand Tool
Position the Cornice in the Mitre Box
Place the cornice face - up and upside down in the mitre box. The ceiling edge should rest on the bottom of the box, and the wall edge against the side wall.
Align to the 45-Degree Slot
Use the correct 45° guide based on whether the cornice goes on the left or right wall. This ensures that the two cuts will meet perfectly in the corner.
Saw with Care
Hold the cornice firmly and use a smooth, steady motion with the tenon saw. Avoid forcing the blade, which can cause chipping or an uneven cut.
Test the Fit
Dry-fit the two mitred pieces in the corner. The edges should align tightly. If not, adjust using sandpaper or a rasp for minor corrections.
Apply Adhesive and Install
Spread adhesive generously along the contact edges and press the cornice into place. Use nails or temporary pins if necessary to hold it while the adhesive sets.
Fill and Finish
Once the adhesive is dry, use caulk or filler to close any gaps and smooth the joint with a damp sponge or finger.
Cutting External Corners with a Hand Tool
Prepare the Marking
Identify the direction of the corner and mark both cornices accordingly.
Set in the Mitre Box
Like with internal cuts, place the cornice upside down in the mitre box. Align it to the correct 45° guide.
Saw Cleanly
Ensure the cut follows the marked line exactly. Precision is vital to avoid visible gaps on external corners.
Test and Adjust
Dry-fit the mitred ends on the external corner. If they don't match perfectly, light sanding can correct small discrepancies.
Fix with Adhesive
Apply adhesive to both pieces and position carefully. Hold or prop the cornice until the bond sets.
Final Touches
Seal the joint, sand if needed, and paint over the filler for a seamless look.
Pro Tips for Perfect Mitre Cuts Using Hand Tools
- Always cut slightly longer than measured and shave down as needed. It's easier to reduce length than to fix a short cut.
- Practice on spare pieces before making actual cuts.
- Use a bevel gauge if walls are not perfectly square. It helps transfer precise angles to your mitre box setup.
- Check every joint before applying adhesive. Adjustments post-installation are harder to manage.
Dealing with Uneven Walls or Ceilings
Old houses or poor construction can lead to misaligned walls and ceilings. In such cases:
- Scribe the cornice by holding it in place and using a pencil to trace the ceiling or wall line. Then cut or shave down accordingly.
- Use flexible caulk to hide slight imperfections.
- Layer adhesive strategically - more on low spots, less on high spots - to even out the fit.
Common Mistakes to Avoid When Cutting Cornices by Hand
- Incorrect orientation in the mitre box: Always check which edge is the wall and which is the ceiling.
- Cutting the wrong direction: Double-check markings before sawing.
- Rushing the fit: Take time to dry-fit and test every joint.
- Inconsistent measurements: Use the same measuring tape and check multiple times.
- Over-sanding: Minor imperfections can be filled; aggressive sanding may ruin the profile.
Final Thoughts: Patience Equals Precision
While power tools can speed up the job, hand tools give unmatched control for small, intricate spaces and delicate materials. With a little patience, you can achieve professional-quality results using simple equipment. Focus on precision, take your time marking and cutting, and always test-fit before final installation.
Mastering mitre cuts by hand isn't just a skill - it's a craft. Whether you're renovating a single room or installing cornice throughout a property, the satisfaction of achieving crisp, clean joints using only hand tools is well worth the effort.
Please watch following short video